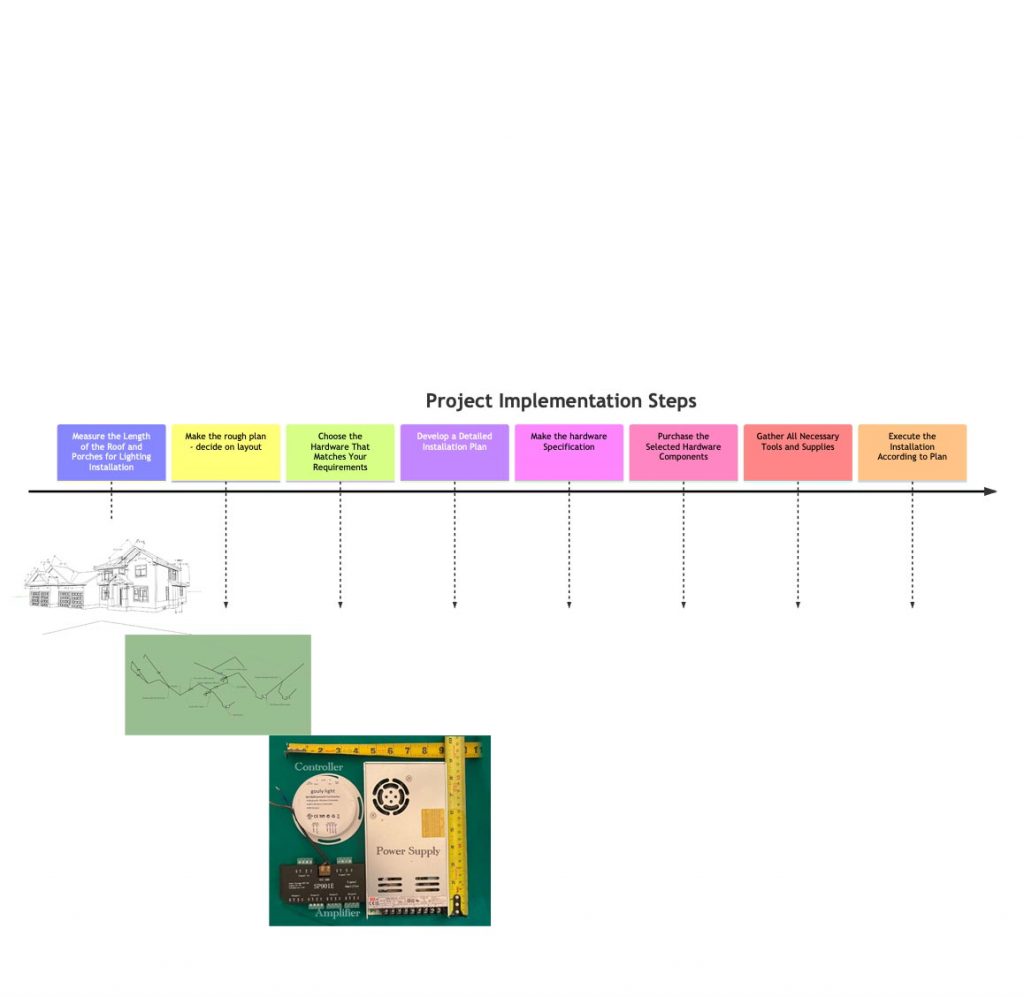
Roadmap for DIY Installation.
- Measure the Length of the Roof and Porches for Lighting Installation
- Draft the rough plan
- Choose the Hardware for Outdoor Illumination That Matches Your Requirements
- Develop a Detailed Installation Plan, Including Wiring and Product Specification
- Purchase the Selected Hardware Components
- Gather All Necessary Tools and Supplies
- Execute the Installation According to Plan
Below you can find essential information on each step.
If you’d like to outsource any of the tasks mentioned, visit our ‘Right Light Services’ page to explore the options.
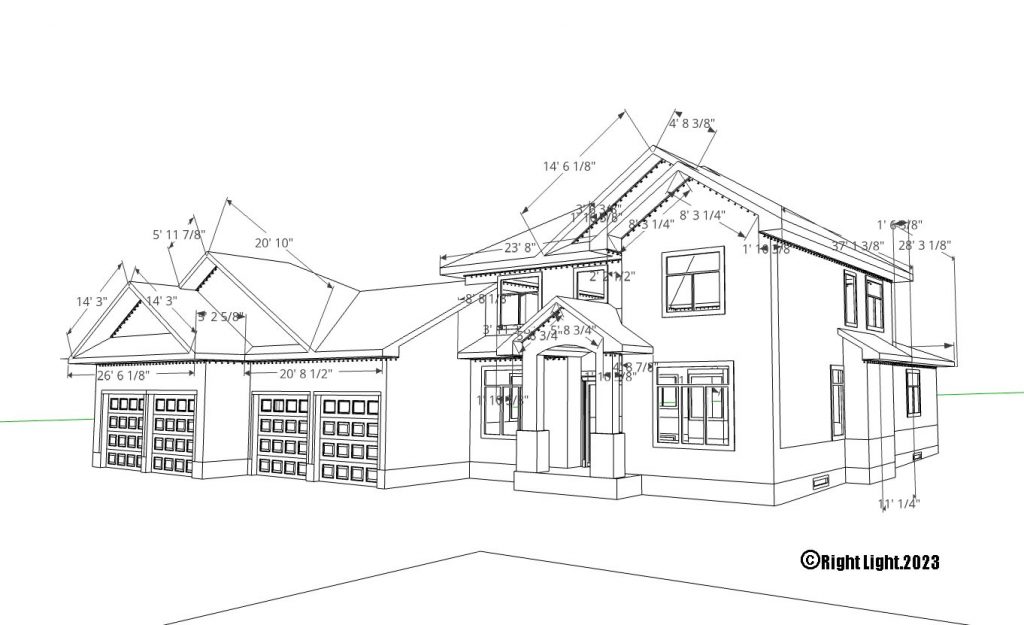
Measure your house
The first step in your DIY journey is to measure the areas where you plan to install the RGBW IC LED lights
Technically, you only need to measure the lengths where you plan to install the LEDs, as well as the distance from your chosen power receptacle to the first LED. However, it’s helpful to also know other dimensions, such as heights and diagonals. This additional information ensures you can access specific points with a ladder or, if needed, verify that a lift arm can reach those points from the driveway.
A tape measure is the most reliable tool for this task because laser meters are not reliable in many weather conditions.
There are also web-based tools available that allow you to measure your house using photos. Some are reasonably priced. However, each tool comes with the hidden cost of time needed to learn how to use it. You’ll need to decide if the time spent learning the tool is less than what it would take to measure your house manually. Your choice may depend on whether you’re more comfortable with web applications or with a ladder and measuring tape.
DIY – Do It Yourself: Save Big with Our Free Guides Use our free online resources to complete your lighting project on your own and maximize savings. Our goal is to brighten Canadian cities, and if our free tips help you do that, we’re thrilled.
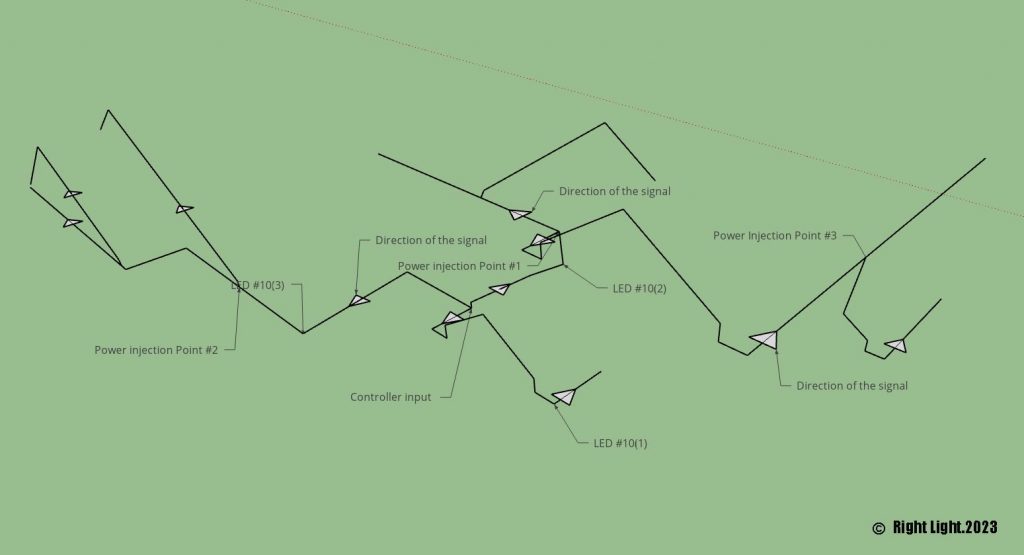
Draft the rough plan.
To create the first rough draft of a wiring plan for a smart lighting system, start by sketching out the LED lines on paper. This will give you a visual idea of how the system will be arranged. Then decide on the type of connection you want for your LEDs, either parallel or consecutive. Parallel connections are generally easier and cheaper to implement but can limit your creative options. For example, in a parallel setup, multiple LEDs might share the same address. Consecutive connections allow for more individual control of each LED but require more wiring and injection points, increasing both complexity and cost.
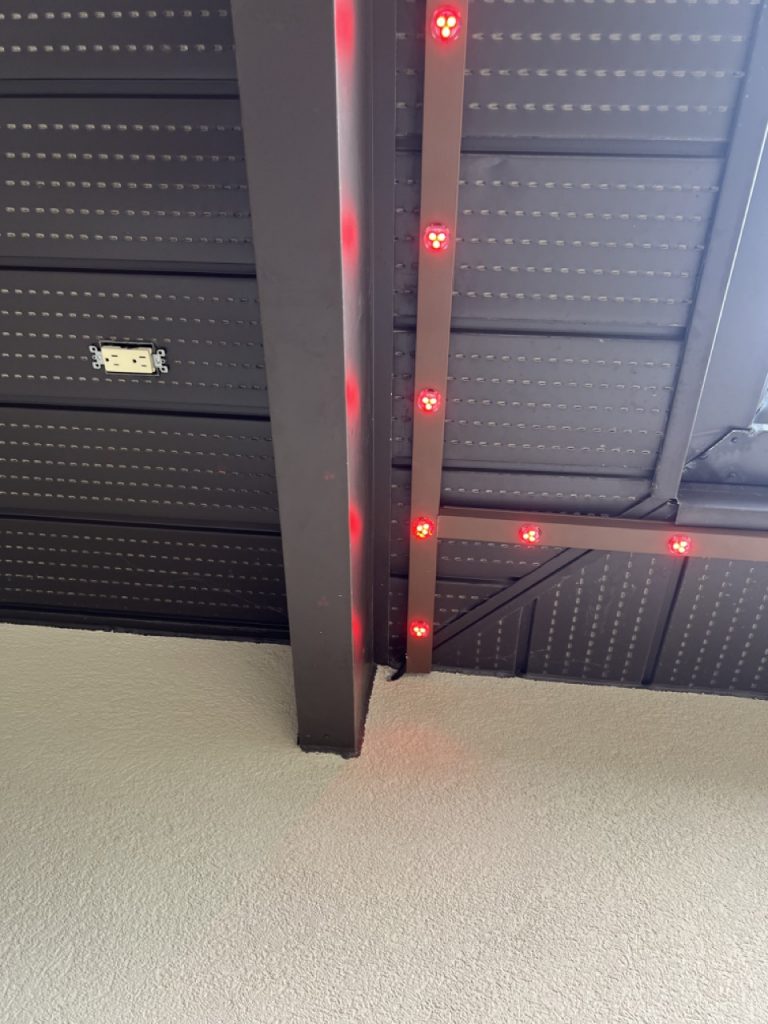
In the example picture, there are three parallel lines coming from the controller. This means that all LEDs on these lines with the same address will execute the same command at the same time. The simple idea of an address is the number of LEDs between a given LED and the controller.
Keep in mind that the signal in your system flows from the controller to the LEDs or other peripheral devices. This is just a starting point that you can refine in later iterations. Future drafts can delve into more complex considerations like voltage compatibility, control protocols, and connectors.
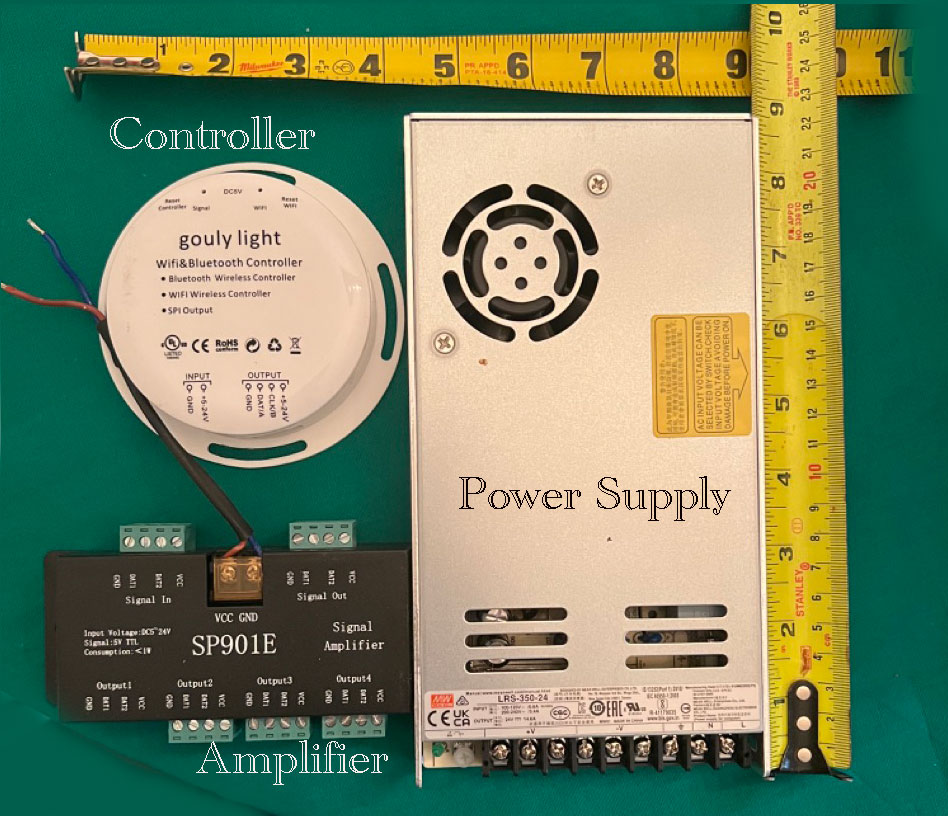
Decide on the hardware.
There are four core elements essential to every smart lighting system:
- Power Supply
- Controller
- Amplifier
- LEDs
Each component plays a critical role, and the choice of which to use depends on your specific needs. It’s crucial to strike a balance between cost, functionality, labor requirements, and aesthetics. Ultimately, you are the best judge of what will meet your objectives. Finally, ensure that all elements are compatible in terms of voltage, control protocols, and connectors to guarantee a seamless and efficient operation.
So now you can upgrade your plan, based on the important considerations.
- Voltage
- Number of Holes in the Walls
- Way of Installation
- Way of Fastening
- Which Controller
- Parallel or Consecutive Wiring
Understanding these points will help you choose the hardware that best meets your needs and expectations for the project. A list of reference materials can be found here
After you decide on the hardware you can update your draft to the wiring diagram.
Develop a Detailed Installation Plan and the Order Specification.
| Component | Circuit Length (m) | LED Count (0.9W each) | Quantity (Units) |
|---|---|---|---|
| Circuit 1 | 5 | 25 | pcs |
| Circuit 2 | 18 | 90 | pcs |
| Circuit 3 | 12 | 60 | pcs |
| Circuit 4 | 4 | 20 | pcs |
| Circuit 5 | 3 | 15 | pcs |
| Total LEDs | 210 | pcs | |
| Power Supply (200W) | 1 unit | ||
| Signal Amplifier | 1 unit | ||
| Control Unit | 1 unit | ||
| 2-Wire Conduit | 29 m | ||
| 3-Wire Conduit | 5 m | ||
| T-Connector | 8 units | ||
| Male Pigtail | 2 units | ||
| Female Pigtail | 2 units | ||
| Junction Box | 1 unit |
- Adjust your draft according to the equipment and materials you’ve chosen.
- Achieving precision is important, but it doesn’t always mean absolute accuracy in measurements. Instead, aim for a balance between precision and practicality. This approach still allows you to provide good specifications, which can be invaluable for the project.
- Include at least 5% additional LEDs in your project specifications. While this may incur extra costs, it’s a proactive measure to avoid delays caused by a few defective units. Waiting for replacements can significantly stall your project’s progress.
- If you opt for a boxed installation, it’s advisable to purchase additional enclosures. Use these extra units to practice and perfect your installation techniques before working on the main project.
- Plan for Future Upgrades: The Smart LED market is continuously growing with innovative devices coming out each year. Given that these systems often allow for seamless additions, it’s wise to allocate extra capacity in your controller for future enhancements.
Purchase the Selected Hardware Components
Supply Channels for Smart LEDs
| Direct from Manufacturer | From Dealers in Canada or US | Online Marketplaces | |
|---|---|---|---|
Advantages |
|
|
|
Disadvantages |
|
|
|
The List of Tools You Need for Installation (Not Comprehensive)
- Screwdriver Set: For opening junction boxes, securing brackets, and other general tasks.
- Wire Strippers: To strip the insulation off the electrical wires for connections.
- Electrical Tape: For insulating wire connections and providing an extra layer of protection.
- Voltage Tester: To ensure that the power is off before working on any electrical components.
- Ladder: For reaching high installation points, such as rooflines or tall trees.
- Drill and Drill Bits: For making holes in walls or other surfaces where the LEDs will be mounted.
- Measuring Tape: To accurately measure distances for wire runs and LED placement.
- Pliers: For bending and cutting wires, as well as for gripping small components.
- Level: To ensure that all mounts and LEDs are perfectly aligned.
- Cable Ties or Zip Ties: For organizing and securing loose wires.
- Wire Connectors: Such as butt connectors, wire nuts, or soldering equipment for secure wire connections.
- Safety Gear: Including gloves and safety goggles to protect against electrical shocks and other hazards.
- Fish Tape: Useful for pulling wires through tight spaces or conduits.
- Crimping Tool: For securing wire connectors.
- Rubber Mallet: For gently securing mounts or brackets without damaging them.
- Heat Shrink Tubing: For a more durable and professional-looking wire insulation.
- Multimeter: For more advanced electrical testing and troubleshooting.
- Scissors for Tin Cutting: Specialized scissors designed to cut through tin or metal, useful for modifying or customizing metal enclosures or brackets.
You can find more technical information and answers to particular questions on the F.A.Q. page
Execute the Installation.
While we can’t offer specific guidance for every installation due to varying requirements, here are some universal recommendations that can benefit any project:
- Start at the Control Box: Begin your installation from the control box and work your way out. Test the lines frequently to avoid having to open all enclosures later to find a faulty component.
- Pre-Test All Elements: Take the time to test all components before installing them. This is especially important for long runs over 100 feet to avoid complicated re-installations.
- Don’t ignore the forecast. A gloomy outlook can make your job exponentially harder and up the ante on risks. We’re talking rain sneaking into your boxes, causing system failures, or wind turning you into a human kite while you’re up on that ladder.
- Grab a Buddy: Trust us, you don’t want to be that guy who’s scaling the ladder for the umpteenth time because you forgot a screwdriver. So, get a friend or even your kids to be your trusty sidekick. Thinking of asking your spouse? Go ahead, but just remember—installing Smart LEDs together could either make you a power couple or send you straight to couple’s therapy!
- Quality vs. Cost: Look, we all want our installations to be picture-perfect, but let’s be real. Striving for that flawless cut can be a time and money sink, especially if it’s going to be hidden away on a gable top where no one but the birds will see it. So, find that sweet spot between quality and effort—it’ll save you time and keep your wallet happy.
We assume you have some familiarity with tools and ladders. If you’re new to DIY, we strongly advise against starting with a Smart LED installation on high surfaces like roofs or porches. Working at heights adds complexity and requires skill. If you’re inexperienced, consider enlisting the help of a handyman.